Home Assistant - Homematic HM-Dis-EP-WM55 e-paper display
Home Assistant
#I recently switched from OpenHab to Home Assistant. While this transition was smooth for most of the devices and integrations the Homematic part was a little more challenging.
Homematic is a proprietary Smart Home solution mainly marketed in Germany. It is actually an entire Smart Home ecosystem similar to SmartThings. It can be used as a standalone solution and has a wide variety of devices. OpenHab has extremely good support from Homematic, I think mainly because OpenHab has a big German community and user group.
The HomeMatic integration of Home Assistant has decent support for many Homematic devices as well, but some have special features like remote control or displays that require more work to integrate. Luckily the Home Assistant integration supports communication with a device on the low-level protocol to send any kind of data to any device.
The display
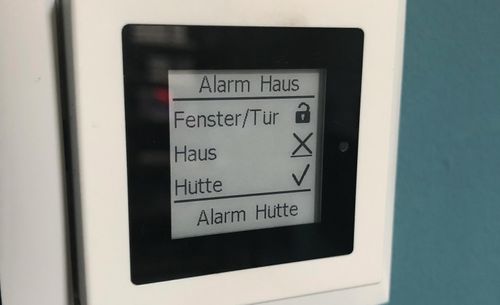
#The device I needed to get working with Home Assistant is the wireless e-paper display (HM-Dis-EP-WM55). It is installed on a central place in our house, displaying the status of open/closed windows & doors and our two alarms for the house and garden house.
The display has 5 lines of text and icons, a three-color LED and a beeper. One can configure the text of the first and last line via the Homematic CCU as fixed device parameters. The 3 middle lines can be controlled and updated via some command. The display itself is always on but consumes very little energy since the e-paper display does not need power all the time, only if changed. It also acts as a switch with two buttons which both can trigger a long or short press event.
Home Assistant integration
#The HM-Dis-EP-WM55 display can be controlled via a dedicated channel (#3) where you have to send the data in order to update the display content. A special encoded string must be sent to the device to update the text, icons, LED color and beeper, all in one. It is not possible to send partial updates; the string must always contain all information one would like to show on the display.
Since there is no Home Assistant device type for a display the only way to communicate with the HM-Dis-EP-WM55 display is via homematic.set_device_value. This command can be used to send any kind of data to any HomeMatic device integrated with Home Assistant. It is basically a low-level interface to a device. To use it one must know the device-specific behavior and data formats the device understands.
I created some python scripts to concatenate all the text lines, icons, LED color and encode the string and push that to the device.
The scripts are split into two parts:
- A generic update_display.py script which does all the encoding and construction of the proprietary string format – this one can be reused directly
- A second, custom to my/your setup script to extract the data from my devices, collecting all and sending it to the first script
The update_display.py script constructs the string beginning with the three text lines and icons, encoding special characters, followed by the beeper code and LED color. This is sent to the device homematic.set_device_value.
The second script is included in my automation’s, once called it collects all the device variables and merges all data into a JSON object. Some values like the device id or display text which does not change are hardcoded. This JSON is sent to the first python script.
The button press events (homematic.keypress) can be captured by a simple automation. See Homematic Home Assistant integration for more details.
The full scripts are available in my Home Assistant config repo in the python_scripts folder on GitHub. These are my first python baby steps, feedback and improvements are always welcome.