Home Assistant backup to Synology NAS
Okay, I don’t think I need to go into detail about why having a solid backup strategy for your Home Assistant solution is important. So I’ll write about how to set it up. I’ve wanted to set up the backup of my Home Assistant installation properly for months. Now that I’ve finally tackled this task, I thought I’d summarize the steps I took.
I’m running Home Assistant on an Odroid N2, and I’m well aware that frequent writes can shorten the lifespan of memory cards. In general a higher quality SD card typically will last longer and can hold multiple years. We also have to consider the entire system, not only Home Assistant itself, but also all add-on like MQTT broker etc. Although this concern primarily applies to SD cards, I wanted to be cautious with the Odroid N2 and its MMC memory.
Until now, I’ve been creating weekly backups directly on the local disk of my Home Assistant server. Later, I manually transferred these backups to our NAS system at more or less regular intervals. Unfortunately, the memory card has filled up multiple times, forcing me to delete older backups.
I previously experimented with syncing backups on Dropbox and Google Drive, but wasn’t really happy with these options either.
However, with the release of Home Assistant 2023.6, native support for mounted network storage was introduced. This feature allows connecting Home Assistant to Windows/Samba (CIFS) or Network File Share (NFS) network shares within the local network. These network shares can serve as media folders or external backup storage.
Now, it’s time for me to give it a try and establish a robust backup strategy.
Home Assistant backup to network storage
#In my case I connected Home Assistant to our Synology NAS. The setup steps are pretty well documented for the Home Assistant part, however the NAS or file server part is always a little more tricky and different. I’ll explain how to configure a network share hosted on the Synology NAS as the main backup location for Home Assistant. This will work with other NAS systems (like QNAP) or file servers as well, but might require some different configuration steps to enable the file share.
Setup step by step
#With the following step by step you should have no problem to set up your own Home Assistant backup to a network share.
1. Create a Shared Folder
#In order to get started, you must create a shared network folder on your NAS. Go to Control Panel > Shared Folder and click Create. Enter a name for the shared folder (such as “Home Assistant Backup”) and select a location. The location options depend on the NAS setup. I only have Volume 1.
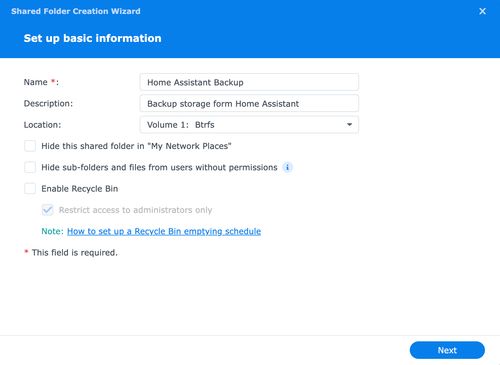
Do not enable the recycle bin feature. Click Next.
On the next screen leave the option at skip. Don’t configure any encryption for the backup folder. You can choose to secure you backup with a password later in Home Assistant.
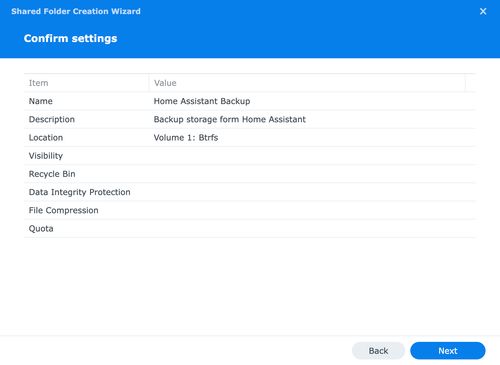
Click Next. Don’t change anything on the advanced setups and click Next again.
Review the settings and click Next to create the shared folder.
Review the access permissions and click Apply.
2. Enable NFS access
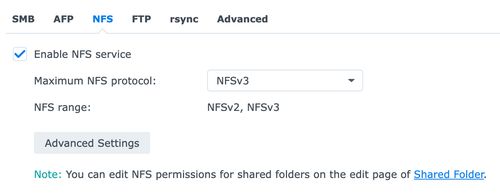
#In this step we will enable NFS file services on the Synology NAS. This step is only needed if not done before during the initial NAS system setup.
In your Synology UI go to Control Panel > File Services and select the NFS tab. If not already checked select the Enable NFS Service checkbox. The screen should look like this:
3. Make the shared folder accessible via NFS
#In the next step we need to enable NFS access and allow Home Assistant to use the newly created network share. I decided to proceed with NFS. CIFS shares are supported by Home Assistant as well, however I could not get it working with my Synology setup.
Select the newly created shared folder from the Shared Folder list in the Control Panel and click Edit.
In the dialog navigate to the NFS Permissions tab and click Create. In the dialog enter the hostname or IP address of your Home Assistant machine.
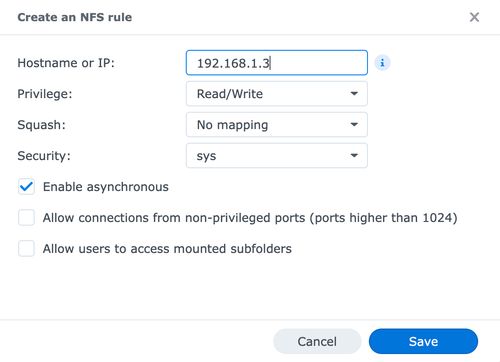
Click Save.
Copy and note down the mount path at the bottom of the NFS Permissions tab.
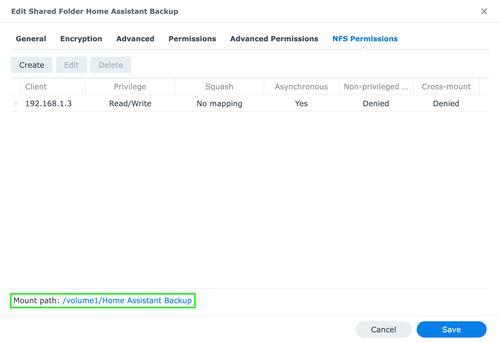
Click Save.
4. Connect the shared folder in Home Assistant
#Let’s switch to Home Assistant and connect to the recently created shared folder on your Synology NAS.
Go to Settings > System > Storage in Home Assistant. In the Network storage section you can see all connected network shares. This list might be empty if you have never connected to network storage before.
Click Add Network Storage button.
In the dialog:
- enter a name, like “HomeAssistantBackup”
- select Backup from the Usage category
- enter the NAS server hostname or IP address
- select Network File Share (NFS) as the protocol
- in the remote share field enter the NFS share mount path you copied in step 3
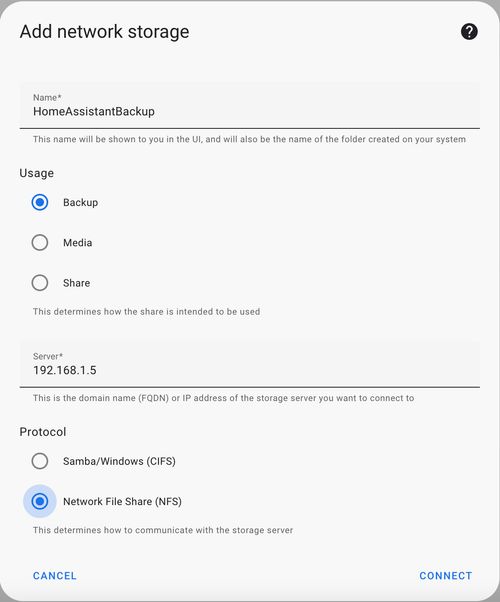
Click Connect.
Home Assistant will not bind the network share and if everything was correct you should see the new network storage in the list of the Network storage section.
If you try to use the CIFS protocol you need to provide a username & password plus the CIFS share name to connect.
5. Change the default backup location
#Once the network share is set up, we only need to change the backup location where Home Assistant stores backups.
Go to Settings > System > Backups in the Home Assistant UI. In the right top corner menu select Change default backup location. In the pop-up dialog select the new backup location and click Save.
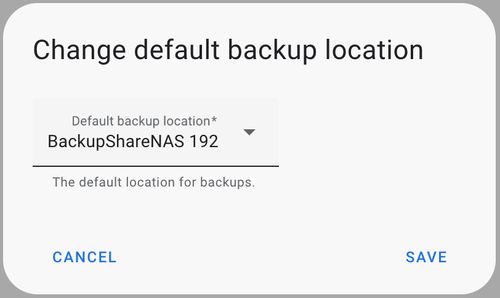
That’s it, the next time a backup is created it will be stored on the NAS network share.
6. List the backups
#There are three options to list the backups stored on our NAS:
- In Home Assistant, navigate to Settings > System > Backups. You will get a list of all backups. In the Location column you can see where these are stored.
- Via Home Assistant CLI run
ha backup listto see all the backups. The result also contains a location attribute for each backup. Also note the slug attribute. This maps to the NAS file share filename. - On our NAS we can simply check the shared folder contents. Each backup is stored as one .tar file. The filename maps to the slug attribute in Home Assistant.
Example:
backups:
- compressed: true
  content:
    addons:
    - a0d7b954_ssh
    - core_mosquitto
    - a0d7b954_adguard
    - core_samba
    - a0d7b954_vscode
    - 15ef4d2f_esphome
    folders:
    - share
    - addons/local
    - ssl
    - media
    homeassistant: true
  date: "2023-07-16T11:23:21.072157+00:00"
  location: BackupShareNAS
  name: Backup_16-07-2023
  protected: false
  size: 216.67
  slug: c528818e
  type: full
- compressed: true
  content:
    addons:
    - a0d7b954_ssh
    - core_mosquitto
    - a0d7b954_adguard
    - core_samba
    - a0d7b954_vscode
    - 15ef4d2f_esphome
    folders:
    - share
    - addons/local
    - ssl
    - media
    homeassistant: true
  date: "2023-07-08T18:00:00.304439+00:00"
  location: null
  name: Backup_08-07-2023
  protected: false
  size: 224.17
  slug: 39b2baaf
  type: full
days_until_stale: 30
Conclusion
#Regularly backing up your Home Assistant configuration is crucial to protect your smart home deployment. While Home Assistant has offered that capability for years to backup to a local disk/memory card then transfer it to external storage afterwards - it is not very reliable. By utilizing a network share as backup storage you add an extra layer of security to your backup strategy. With these steps in place, you can rest assured that your Home Assistant configuration is safe and easily recoverable in case of unforeseen events.
Happy automating!
Hero image from Fernando Lavin on Unsplash